Notification Agents
A Notification agent is a pluggable component that sends Notification messages. Each Agent is responsible for sending notifications to users when CMS activity occurs. How that notification is sent is up to the Notification Agent itself. Once a Notification Agent is created and registered, users can begin setting up notification preferences that use it.
Ektron CMS400.NET has predefined Notification agents, including email, SMS, and Activity Stream agents.
SMS Notifications are sent to a cell phone or another device that receives SMS messages. See Also: Configuring SMS
Activity stream Notifications are posted via the ActivityStream server control. See Also: Activity Streams
email Notifications are delivered to appropriate recipients inboxes. See Also: Using email to Communicate Community Activities
You can customize these providers or create your own using the extendable Notification agent architecture.
Agents are more fully explained through these topics.
Enabling an Agent
For an agent to be available for sending Notifications, it must be enabled in Ektron CMS400.NET. See Also: Notification Agents
Note: Ektron CMS400.NET’s predefined agents are enabled by default.
To enable an agent, follow these steps.
1. Log in to the Workarea as an administrator.
2. Navigate to Settings > Community Management > Notifications > Agents.
3. Click the name of an agent.
4. Click Edit .
5. Click the Enabled check box.
6. Click Save.
Disabling an Agent
To disable an agent, follow these steps. See Also: Notification Agents
1. Log in to the Workarea as an administrator.
2. Navigate to Settings > Community Management > Notifications > Agents.
3. Click the name of an agent.
4. Click Edit.
5. Uncheck the Enabled check box.
6. Click Save.
Creating a Custom Agent
CMS 400.NET comes with several standard Notification Agents, including email, SMS, and Activity Stream. You can customize these agents or create your own using the extendable Notification Agent provider architecture. This section explains how to extend the object model to build a customized Notification Agent.
Each type of Notification Agent accepts configuration parameters. For example, email and SMS require an SMTP server, username, and password. These parameters can be specified in the web.config file, and read when the Agent is initialized the first time.
Each agent may also require storing settings for each user receiving notifications. For example, the SMS agent requires the user’s cell phone number and carrier, which it stores as an SMS email address. To save these properties, each Notification Agent has an associated NotificatAgentSettingsData class. This class defines any properties needed to be supplied by the user. The CMS provides APIs for storing and retrieving this information, but the developer must create an interface for users to supply the information. The SMSAgentSettings.aspx page, supplied with the Developer and Intranet starter sites, provides a good example.
The following sections describe how to extend the functionality of the Ektron CMS400.Net Notification Agent and create your own.
Implementing Your Own Notification Agent Provider
Object Model
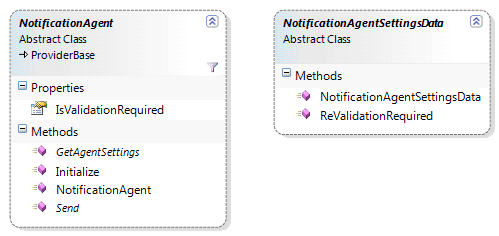
The NotificationAgent is the abstract base class you must extend to implement your own notification agent. Details on the class, available properties, and methods you are required to implement are below.
|
Method |
Description |
|---|---|
|
virtual void Initialize(string name, Amenable config); |
The initialize method comes from the ProviderBase base class. It supplies all name value pairs specified in the Providers web.config section. If custom settings need to be provided to your agent, add them to your provider’s web.config key, and they will be provided to you at runtime in the Initialize method. If you have no custom settings, this class does not need to be overridden. |
|
abstract NotificationAgentSettingsData GetAgentSettings(); |
This method should return a new instance of the NotificationAgentSettingsData class associated with your Agent. |
|
abstract void Send(NotificationMessageData message); |
This method should send the actual notification. It will be called by the notification engine for each user that needs to be notified. The NotificationMessageData has all the information you need for sending the notification, including the message itself the user to be notified the NotificationAgentSettingsData for the user to be notified. If your agent has a custom NotificationAgentSettingsData, you need to cast the supplied NotificationAgentSettingsData to the appropriate type so that you can access the appropriate properties. |
Next, add the agent. See Adding an Agent.
Adding an Agent
To add a custom agent to Ektron CMS400.NET, follow these steps. See Also: Notification Agents
1. Insert the provider between the Notification agent’s providers tags in the site root/web.config file. Below is an example.
**<notificationAgent>
<providers>
<add name="CustomAgent1" type="Ektron.Cms.Notifications.Providers.CustomAgent1,Ektron.Cms.Providers" setting1="" setting2=""/>
<add name="EktronEmail" type="Ektron.Cms.Notifications.Agents.EktronEmailAgent, Ektron.Cms.BusinessObjects" useSystemSettings="false" smtpServer="amh010" smtpPort="25" userName="" password="" fromEmail="admin@example.com"/>
<add name="SMSAgent" type="Ektron.Cms.Notifications.Agents.SMSAgent, Ektron.Cms.BusinessObjects" smtpServer="amh010" smtpPort="25" fromEmail="SMSAgent@example.com" validationRequired="true"/>
<add name="ActivityFeed" type="Ektron.Cms.Notifications.Agents.ActivityFeedAgent, Ektron.Cms.BusinessObjects" validationRequired="false"/>
</providers>
</notificationAgent>
After you add an agent to web.config, it appears in the list of available agents in the Workarea.
2. Log into the Workarea as an administrator.
3. Navigate to Settings > Community Management > Notifications > Agents.
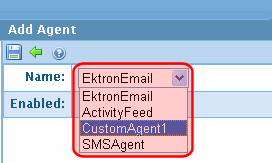
4. Click Add.
5. Select the custom agent from the Name drop down box.
Note: If you do not see the custom agent in the Name dropdown, check the web.config file to verify it is listed between the <notificationAgent> <providers> tags.
6. Place a check mark in the Enabled check box.
7. Click Save.
Removing an Agent
When you no longer need an agent, you can remove it. This can be a two step process, depending on the level of removal you are trying to achieve.
First, remove the agent from the list of agents in the Workarea. At this time, you can easily return the agent to the list. In the second step, you remove the agent from the web.config file.
To remove an agent from the list of available agents, follow these steps.
1. Log in to the Workarea as an administrator.
2. Navigate to Settings > Community Management > Notifications > Agents.
3. Click the title of the agent.
4. Click Delete ( ).
).
5. In the Delete Agent dialog box, click OK.
The page refreshes, and the agent is removed from the agents list.
To completely remove the agent from Ektron CMS400.NET, follow these additional steps.
6. Open the site root folder’s web.config file.
7. Between the <notificationagent>’s <providers> tags, remove the agent.
Below is an example of agents that might appear in the web.config file.
<notificationAgent>
<providers>
<add name="CustomAgent1" type="Ektron.Cms.Notifications....
<add name="EktronEmail" type="Ektron.Cms.Notifications....
<add name="SMSAgent" type="Ektron.Cms.Notifications...
<add name="ActivityFeed" type="Ektron.Cms.Notifications...
</providers>
</notificationAgent>
See Also: Configuring SMS